浅析 t-io 内置集群
好多小伙伴们问t-io集群如何实现,今天与大家一起探讨探讨。
集群思路
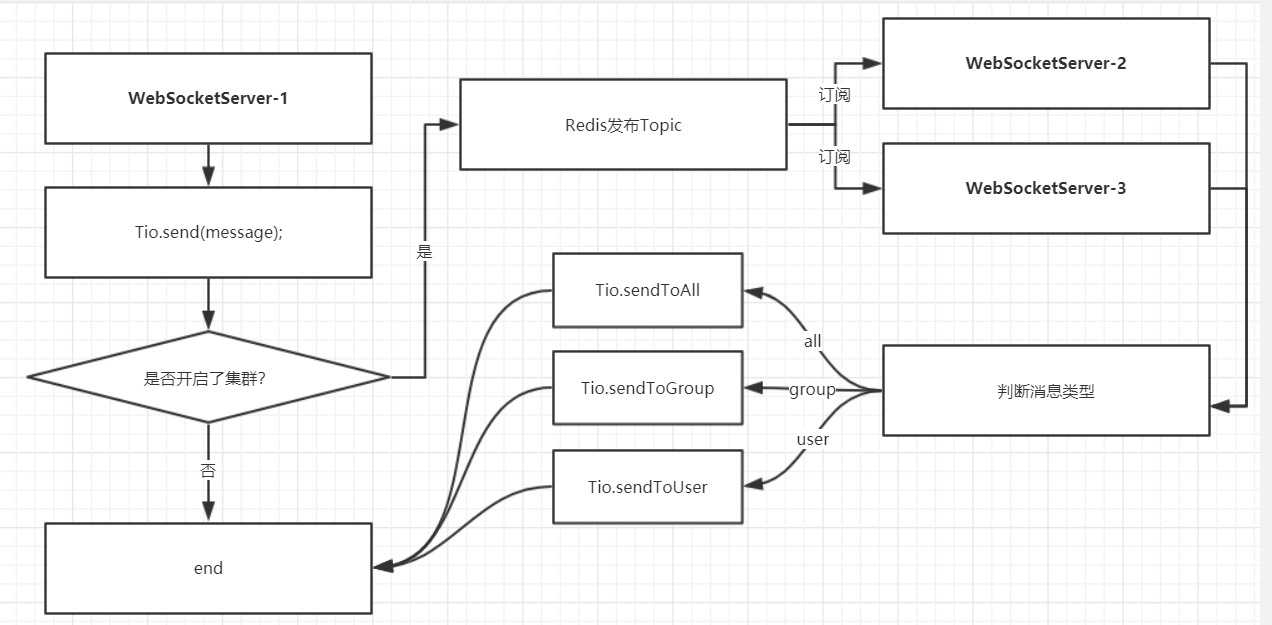
tio使用了Redis的Topic功能实现了集群,大体流程如下:

Demo 演示
这里我趁热打铁,使用tio-websocket-spring-boot-starter 给大家做演示。
- 首先我们要在初始化 WsServerStarter 的时候,加入集群配置
public class TioClusterConfig {

    public static final String TIO_CLUSTER_TOPIC = "TIOCORE_CLUSTER";

    private TioClusterTopic tioClusterTopic;

    /**
     * 群组是否集群(同一个群组是否会分布在不同的机器上),false:不集群,默认不集群
     */
    private boolean cluster4group       = false;
    /**
     * 用户是否集群(同一个用户是否会分布在不同的机器上),false:不集群,默认集群
     */
    private boolean cluster4user        = true;
    /**
     * ip是否集群(同一个ip是否会分布在不同的机器上),false:不集群,默认集群
     */
    private boolean cluster4ip          = true;
    /**
     * id是否集群(在A机器上的客户端是否可以通过channelId发消息给B机器上的客户端),false:不集群,默认集群<br>
     */
    private boolean cluster4channelId   = true;

    /**
     * bsid是否集群(在A机器上的客户端是否可以通过bsid发消息给B机器上的客户端),false:不集群,默认集群<br>
     */
    private boolean cluster4bsId    = true;
    /**
     * 所有连接是否集群(同一个ip是否会分布在不同的机器上),false:不集群,默认集群
     */
    private boolean cluster4all     = true;
    // getter setter
要配置集群功能,需要有 RedissonTioClusterTopic Bean ,它的初始化方法很简单,传入订阅的频道名称和 RedissonClient
    @Bean
    @ConditionalOnBean(RedisInitializer.class)
    public RedissonTioClusterTopic redissonTioClusterTopic(RedisInitializer redisInitializer) {
        return new RedissonTioClusterTopic(CLUSTER_TOPIC_CHANNEL,redisInitializer.getRedissonClient());
    }
然后将注册集群配置到ServerTioConfig中
  //可能不开启集群功能。 tio.websocket.cluster.enabled = false
  if (redissonTioClusterTopic != null && clusterProperties.isEnabled()) {
      this.clusterConfig = new TioClusterConfig(redissonTioClusterTopic);
  }
  if (clusterConfig != null) {
     serverTioConfig.setTioClusterConfig(clusterConfig);
  }
其他的配置不变。
- 客户端修配置如下
tio:
  websocket:
    server:
      port: 9876
      heartbeat-timeout: 60000
    cluster:
      #开启集群
      enabled: true
      #群组消息集群
      group: true
      #redis配置
      redis:
        ip: 127.0.0.1
        port: 6379
server:
  port: 8081
- 同样,加上 @EnableTioWebSocketServer 注解
@SpringBootApplication
@EnableTioWebSocketServer
public class SamplesApplication {
    public static void main(String[] args) {
        SpringApplication.run(SamplesApplication.class,args);
    }
}
- 编写一个简单的消息处理器
@WebSocketMsgHandler
public class EchoMsgHandler implements TioWebSocketMsgHandler {

    //为了区分出集群效果,我们把端口发送给客户端
    @Value("${tio.websocket.server.port}")
    private Integer port;

    private static final String GROUP_ALL = "TIO-WEBSOCKET-SPRING-BOOT-STARTER-ALL";

    @Override
    public HttpResponse handshake(HttpRequest httpRequest, HttpResponse httpResponse, ChannelContext channelContext) throws Exception {
        String userId = httpRequest.getParam("uid");
        if (StrUtil.isBlank(userId)) {
            httpResponse.setStatus(HttpResponseStatus.C401);
        }
        return httpResponse;
    }

    @Override
    public void onAfterHandshaked(HttpRequest httpRequest, HttpResponse httpResponse, ChannelContext channelContext) throws Exception {
        Tio.bindGroup(channelContext, GROUP_ALL);
        String userId = httpRequest.getParam("uid");
        Tio.bindUser(channelContext, userId);
        TioWsUtils.sendToAll("new User:" + userId + " said :I come from :" + port);
    }

    @Override
    public Object onBytes(WsRequest wsRequest, byte[] bytes, ChannelContext channelContext) throws Exception {
        return null;
    }

    @Override
    public Object onClose(WsRequest wsRequest, byte[] bytes, ChannelContext channelContext) throws Exception {
        Tio.remove(channelContext, "websocket closed");
        return null;
    }

    @Override
    public Object onText(WsRequest wsRequest, String s, ChannelContext channelContext) throws Exception {
        TioWsUtils.sendToGroup(GROUP_ALL, "msg from " + port + ":" + s);
        return null;
    }
}
- 启动程序
//server1
java -jar ./target/tio-websocket-spring-boot-starter-sample-1.0-SNAPSHOT.jar --tio.websocket.server.port=9876 --server.port=8081
//server2
java -jar ./target/tio-websocket-spring-boot-starter-sample-1.0-SNAPSHOT.jar --tio.websocket.server.port=9875 --server.port=8082
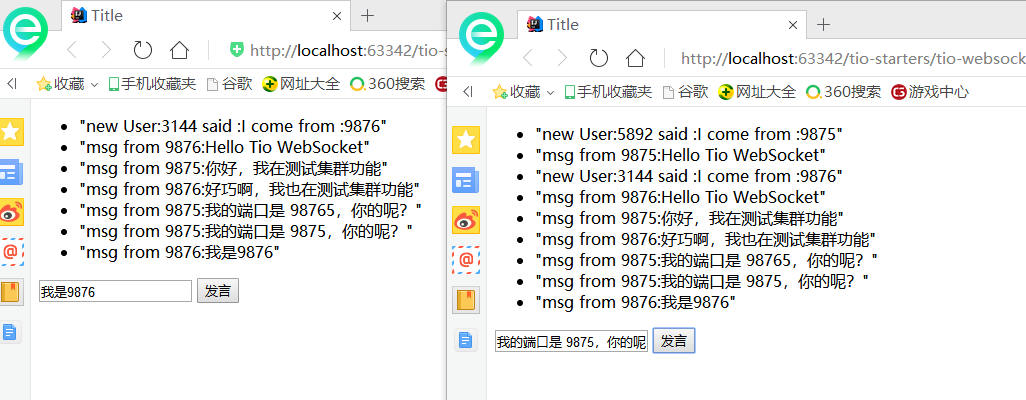
分别打开 index1.html index2.html (里面代码是一样的,端口不一样)

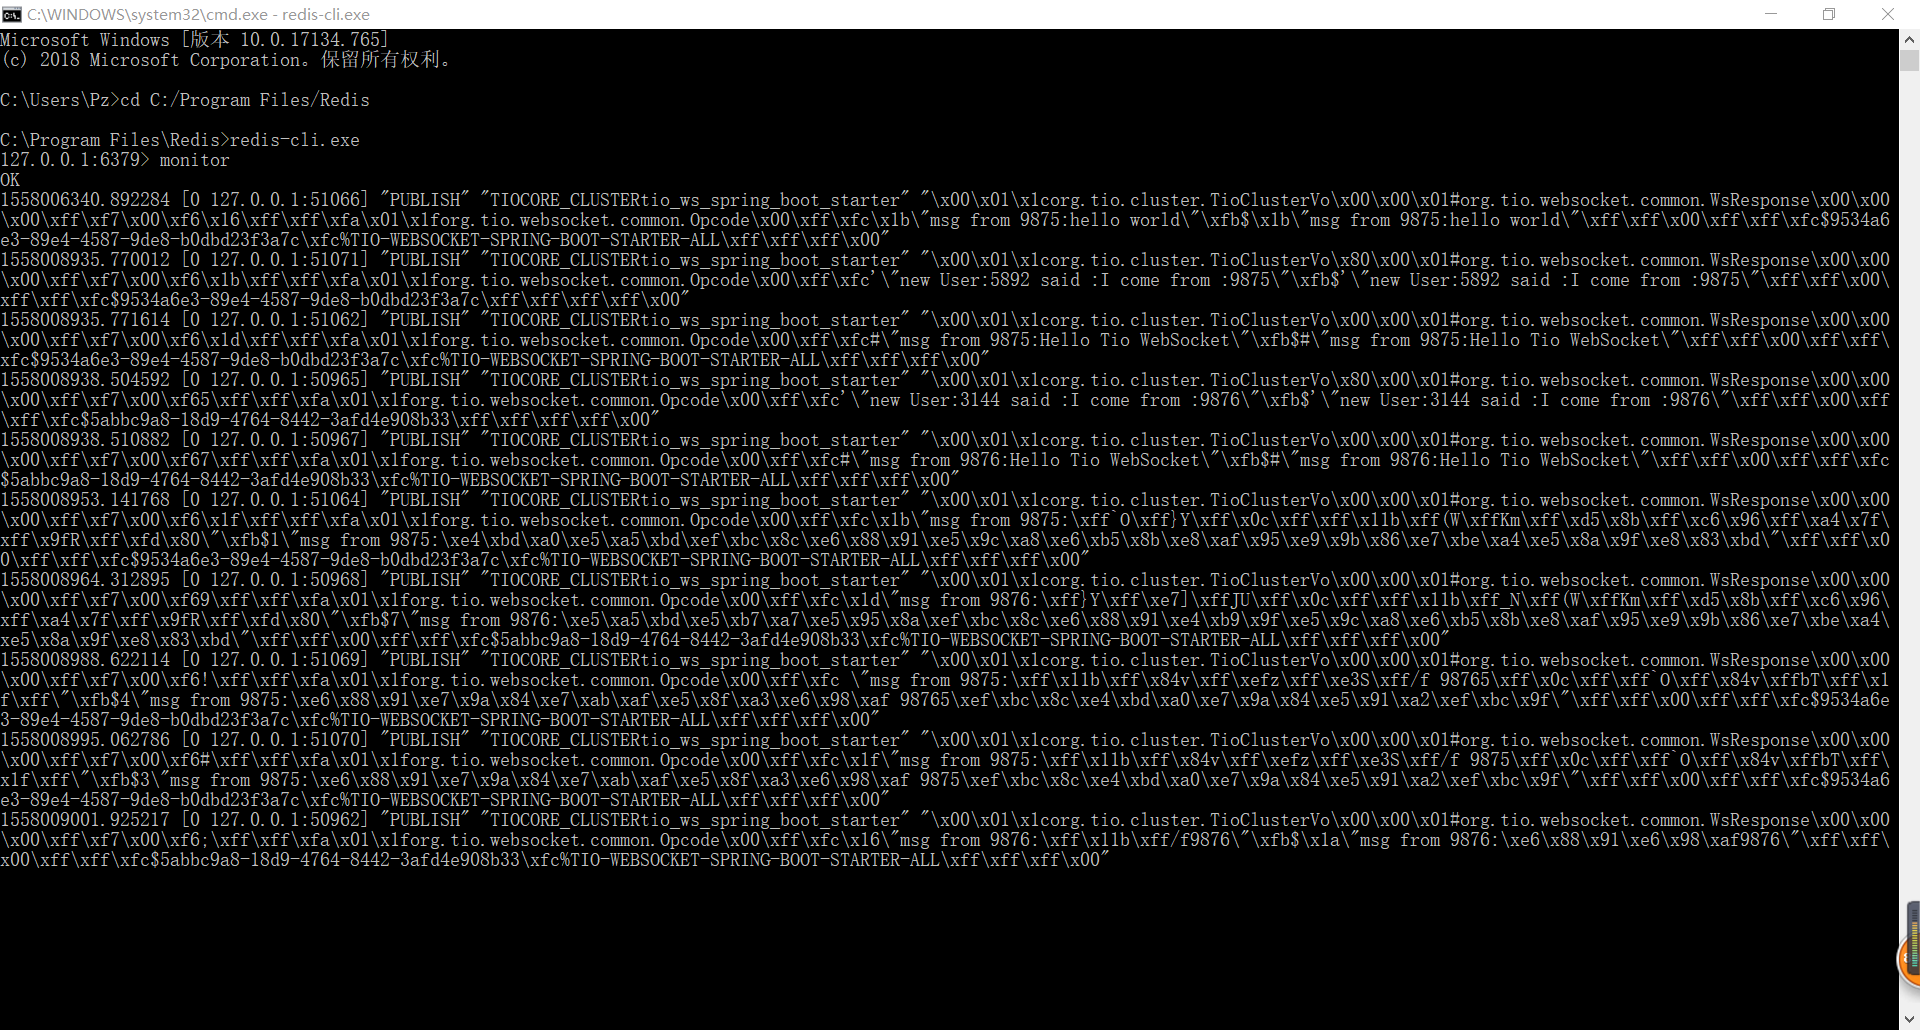
Redis monitor

集群进阶-反向代理
- nginx.conf
  upstream tiows {
        server 127.0.0.1:9876 weight=1;
        server 127.0.0.1:9875 weight=1;
    }

    server {
        listen       80;
        server_name  localhost;
        location /ws {
            proxy_http_version 1.1;
            proxy_set_header Upgrade $http_upgrade;
            proxy_set_header Connection "upgrade";
            proxy_pass http://tiows;
        }
总结
就到这里,希望能给你带来收获。